
From Drab to Fab
- Simply Renew

- Jul 2, 2021
- 3 min read
Wardrobe Makeover

What to do when you have a perfectly sized, perfectly good condition wardrobe, but is does not fit into your current style? My answer to that is simple, upcycle it!
I received a photo from a client asking if I could paint her dated, orange pine wardrobe black and of course my answer was yes! But it needed something else, just a black painted wardrobe would still look a little boring and frankly still drab.
One of my new favourites to add to all sorts of painted pieces are air dry clay embellishments, so over a cup of tea, I showed her a few options, discussed her final look and decided on the way forward.
Here is the step by step of how I changed this drab wardrobe into a fab one. It is now good to serve the family for a good few years, or until the decor needs updating again.


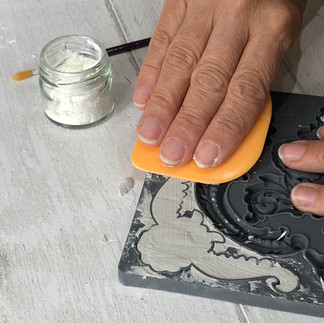
Usually I just wipe down the surface with a damp cloth, when using standard chalk paint, but the paint we chose for this project is Frenchic Lazy Range. This range has a sealant added to the paint and Frenchic recommends to clean the surface with sugar soap to allow the paint to adhere well..
Over the years I have learnt a few tricks of my own and like to use an old rag and White Spirit to remove not only dust, but grease in preparation to paint.
Allow at least 30 minutes for the White Spirit to dry and evaporate before adding embellishments or painting.
As mentioned, my client wanted the piece to be a feature piece, so I added clay embellishments to create detail on the doors. This detail will later be picked out with a beautiful, glitzy gold.
I use air dry clay and IOD Moulds to create these embellishments. Simply squish the clay into the mould, level and turn out. I do brush a little cornflour onto the mould to help it release.

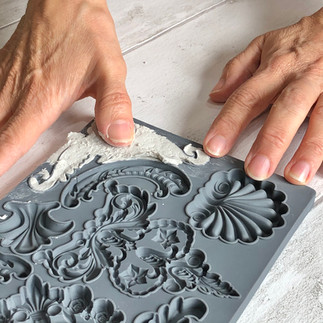

You can allow the mould to set and then apply to a flat surface, but I prefer to apply it when it is still pliable. Any Pva or Woord glue should work to adhere the embellishment to the surface. I used Gorrilla Wood Glue.
It was a very hot and sunny day, when I did this project and I did not foresee that the glue ws 'melting' and not holding the embellishment in place. A bit or strong card board and some masking tape to the rescue! I simply taped the cardboard below the embellishment to keep it in place and left it to dry overnight.


I combined 2 embellishments to create a larger, more dramatic feature. The air dry clay may shrink a little on drying and they can show a few cracks. I actually like these imperfections and think it creates more texture and dimension for the paint and gold guilding to adhere to.
Once these embellishments dried, it was time to paint. I chose Frenchic Black Jack and started painting. (By the way, I left the wardrobe in my client's house and painted it right in the room that it usually lives in.)
I applied 2 coats of paint, allowing the first coat to dry completely and taking care to get into all the nooks and crannies of the embellishments. It helps to use a slightly smaller brush for the detail bits.

When the paint had dried, I used a small artist brush to apply a little gold paint to the embellishments, raised edges of the doors and drawers, as well as the doorknobs. This really lifted the entire piece and turned it into a a unique item of furniture.


I hope this has inspired you to have a go at transforming a dated piece of furniture into something fabulous!
Happy weekend
Much love
René


Comments